by Jenny Hansen
Do you have critique partners? Editors? Agents? Family and friends that look over your Work in Progress?
I’m betting that you trade manuscripts with these people and that, for those of you who don’t know how to use Track Changes, you buy a lot of paper. And ink cartridges. And red pens (or whatever friendlier color you use to write in the margin and remind your critique partner to use an active verb).
Consider this article my Valentine’s gift to ease the bottom line on your purchases at Office Depot – we’re going to talk about how to use one of my favorite features in Word.
Microsoft Word’s Track Changes feature can be activated a few ways:
– Go to the Tools menu and choose Track Changes
– Hit Ctrl+Shift+E (remember, you don’t type the plus signs)
– Double click on TRK in the status bar at the bottom of your Word window.
Note: Your status bar is the area that starts with “Page 1†and “Sec 1.†On the right side of this status bar there is an area that says REC and TRK – these are grayed out unless they are activated. You may double-click on the TRK to activate the Track Changes feature (the REC is to record a macro, which is not covered here). You may double-click on the TRK again to toggle the feature back off. The darkened TRK in the status bar is the easiest way to tell at a glance that Track Changes is on.
When you turn on Track Changes, the following Reviewing toolbar will appear:
If you would like to turn this toolbar on and off separately from using Track Changes, simply go to the View menu and choose Toolbarsà Reviewing, or right-click on any existing toolbar and then choose Reviewing from the shortcut menu. Since the Insert Comment and Reviewer Pane buttons are also accessible here, as well as a button to turn on Track Changes, this is an extremely great toolbar to keep on your screen.
Note: For those of you who are now using Word 2007, you do not have menus anymore –you have the Ribbon. You may add buttons and features to the Ribbon with the right-click method described above. Additionally, all the old shortcuts like Ctrl+Shift+E will work.
While the Track Changes feature is on, everything you do to a document is being recorded. The Reviewing toolbar has a great button on the far left that allows you to choose things like Original, Final or Final Showing Markup. This button is invaluable if you want to print out the manuscript without all the changes showing.
If you have set up your User Information in the correct tab in Options (located under the Tools menu) your initials will even appear next to the changes you make. If your critique partner decides to print up the document with the changes he or she will be able to tell your manuscript changes from that of your other critique partner who might be wild about head-hopping and adverbs.
My favorite part about the Track Changes feature is that the person receiving the critique can activate it on his or her own computer and choose to Accept or Reject Changes. Every change offered by a critique partner, editor or agent does not have to be accepted, as you know. At the end of the day, this is YOUR book.
Be sure to turn your Reviewing toolbar on and play with it – pass your mouse across all the buttons so that the yellow tool tip will tell you what each button means. As always, you can email me at
jennyhansensmail@aol.com if you have more questions about the content in this blog.In the meantime, Happy Writing! I hope Cupid was nice to you and your manuscript this month.
By day, Jen manages the sales and marketing for a national training firm (after 12 years as a corporate software trainer, it’s nice to be able to sit down while she works). By night, she writes women’s fiction, chick lit and short stories as Jenny Hansen.She has been a member of OCC since 2001 and has served as the Orange Rose Contest Coordinator, as well as on OCC’s Board of Directors in a variety of capacities.
- Author Details
- Books on Sale
- New Releases
- Contact Us
- Be in the Spotlight
Books on sale or free

Related
Words on 2007…
by Jenny Hansen
I planned an article on Track Changes for this month…really I did. Yet every time I’ve sat down to work on the blog, I’ve found myself writing other things — stories…emails…miscellaneous thoughts.
Christmastime is a very nostalgic season for me filled with family, traditions and memories of loved ones who are no longer here to celebrate. December marks the birthday of my first “baby girl†– 90 pound Akita, Hoshi – who just turned 12 today. That might not sound like a lot in dog years but in human years, she just turned 84. Impressive.
I made a celebration out of what could very well be her last birthday – bought pink party hats and a snazzy birthday bandana, gave her extra treats. We took her Golden Retriever friend, Tatum, to Dog Nirvana in Huntington Beach for a snack and a two mile walk…not bad for an old girl like Hosh.
Note:
Dog Nirvana is better known to locals as the Park Bench Café in Huntington’s Central Park where doggies get to eat breakfast (Hoshi had the Wrangler Roundup) with their humans and then walk along numerous trails, sniffing doggie smells and chasing ducks. If you’re an Orange County dog owner and you haven’t visited the Park Bench, you’re missing out! http://www.parkbenchcafe.com/
As we walked the trails, I looked down at my girl and lived in my memories of her. I thought of the changes we have weathered together these last twelve years: my entire 30’s, the tragedy of September 11th, the tearing grief of my mother’s death, the shining joy of my marriage. I’m hoping she will see the birth of my children and the advent of my 40’s next November.
Now that the party is over, she’s lying in a patch of sunlight in my office while I finish this article, snoring away as holiday music soars through the air.
After I post this, I will finish the baking I do every year at this time, bringing to life the treasures I’ve made each year for all my memory, as did my mother and her mother and grandmother before her. I make recipes like divinity, Almond Roca and Russian tea cakes that have been handed down through our generations.
Each November, I look forward to pulling out the package of papers and special notes, this one written in my grandmother’s elegant penmanship and that one in my mother’s bold scrawl. Each year, the ritual brings the shimmering presence of these strong women into my kitchen where I’m able to visit with them for a short time.
In a few hours, my house will smell like the home of my childhood and Hoshi will come lay her head against my leg and look up to give me “cute eyesâ€, begging for treats. In these final days of 2007, I wish each of you such a perfect day.
Next month is soon enough for the article on Track Changes…today is for family.
Happy Holidays!
By day, Jen manages the sales and marketing for a national training firm (after 12 years as a corporate software trainer, it’s nice to be able to sit down while she works). By night, she writes women’s fiction, chick lit and short stories as Jenny Hansen. She has been a member of OCC since 2001 and has served as the Orange Rose Contest Coordinator, as well as on OCC’s Board of Directors in a variety of capacities.
- Author Details
- Books on Sale
- New Releases
- Contact Us
- Be in the Spotlight
Books on sale or free

Related
A Proper Break
by Jenny Hansen
Several years ago, I traveled to the UK to train several groups of students there on how to use the (then) newly released Macintosh OS-X Jaguar and the new version of Microsoft Word that came out at the same time. I learned a lot in that trip to London, mostly about the many things that I thought I knew how to do and really didn’t.
For example, I heard a lot about how to brew “a proper pot of tea.†Nearly every group I taught my first few days there had to show the American how to brew tea. They would take me over to the break room in between class sessions. (Mind you, we took breaks about every hour) and take me through British Tea 101: use cold water, bring to a full boil, warm the teapot with a good swish of hot water before you begin to steep the tea for 3-5 minutes. The directions were quite precise and without variation…I’ve included a link at the bottom of this blog for any who would like the full list of tea Do’s and Don’ts.
Proper tea was just another thing, along with phrases like “being hard up†(poor) and “pissing down†(raining) that I thought I knew the meaning of before I went. I heard all kinds of great phrases but I particularly liked the word “squiffy†– I think it has a cute sound – and, since I did participate in a local pub crawl, I heard it quite a bit (http://wordnet.princeton.edu/perl/webwn?s=squiffy).
George Bernard Shaw wasn’t kidding when he described England and America as “two countries separated by a common language.†I discovered, as I taught these British students, how important it was to be precise in my directions to avoid confusion. I learned to drop slang from my classroom presentation – we would end up talking about American slang instead of Microsoft Word – and I absolutely delighted in listening to my students speak.
One particular girl came to several of my classes and I loved to hear her speak in her Cockney accent. She ended up visiting my classroom almost every day and every time she came, we made each other laugh. We had long discussions about the differences between our cultures. I’d thrill her with my impersonation of various American accents and she’d ask me questions like, “What do you mean you’ve never seen a proper tea spoon?â€
It was from her that I learned that Americans work more hours and take less vacation than Europeans do. When I shared with her that we get two weeks of vacation a year as part of our standard employment package, she was struck dumb for a moment. When she recovered she said, “Two bloody weeks a year? The lot of you must be mad! I’m dotty on less than four.â€
In return for all the fantastic local slang she shared with me, I stayed through lunch one day to brew her a proper pot of tea and teach her, in her own words, how to make a proper break.
A proper Break, you ask? How does one MAKE a proper Break?
In Microsoft Word, there is a tool that every creator of long documents – particularly long documents with sections (like chapters) should know – and that is how to use Breaks.
Think of a break as an interruption:
I want to interrupt this page… one would use a page break.
I want to interrupt this column…a break would help again!
What about if I need to go to the next Chapter and have the Header or the Footer change to say Chapter 2 instead of Chapter 1 now…once again, a Break!
There are several different kinds of Breaks and they are all located in the Insert menu under Break…:
Page Break
The keyboard shortcut for this is to hit the CRTL and the Enter button at the same time. This will immediately move you to the next page without having to hit the Enter key eighteen times to get there.
Column Break
The keyboard shortcut for this is to hit the CTRL, the SHIFT and the Enter key simultaneously. If you are creating two or more columns of text (think about our newsletter or even your own notes and lists of words), the Column Break can keep you from having one little orphaned line at the bottom of a column. A Column Break says, “Move those lonely little words out of this column and into the next one.â€
Text wrapping Break
This is a new feature that was added to the later versions of Word and it is quite useful if you use a lot of tables or graphics in your documents. This ends the current line and forces the text to continue below a picture, table, or other item.
Section Break
There are several different kinds of section breaks, though most writers use only one. I don’t want to short-change anyone who wants to use them all so I’ll define each type in greater detail.
Section break types:
Next page
Inserts a section break and breaks the page so that the next section starts at the top of the next page.
I use section breaks in conjunction with changes to chapter Headers and Footers in my manuscript. (If you don’t know what I mean when I say “Headers and Footers†you need to either refer to an earlier column or go to Word and hit the F1 key to get help on this feature.)
Next Page breaks allow you to break this chapter and go to the next. When you are finished with your manuscript, you will then go back through your manuscript and change each section to have the proper heading (i.e. Chapter 1, Chapter 2 and synopsis). By using Next Page section breaks, you allow your page numbering to stay consistent throughout your manuscript and this is HUGE. I know writers who put their page numbers in by hand and it breaks my heart to see them waste so much time. USE BREAKS!!!
Continuous
I think of this as interrupting formatting for part of a page, rather than an entire page. For example if I want to have a page of text with three columns in the very middle of the page, the only way to do it is to put a Continuous section break before and after the text I want to turn into columns. Otherwise Word will turn the entire document into columns.
Note:The only individuals I’ve ever seen use the next two types of breaks are people who make course ware books for subjects like math where the text goes on the left page and the diagrams go on the right, or vice-versa.
Even page
Inserts a section break and starts the next section on the next even-numbered page. If the section break falls on an even-numbered page, Word leaves the next odd-numbered page blank.
Odd page
Inserts a section break and starts the next section on the next odd-numbered page. If the section break falls on an odd-numbered page, Word leaves the next even-numbered page blank.
I’m sure you’ve already guessed how this odd topic came up in an everyday discussion about Word. However, if you are still wondering, my student was one of that special breed of people…she’s a writer.
Promised links:
How to brew a proper pot of tea if you are British or Irish: http://www.superluminal.com/cookbook/beverages_tea_english.html
A list of all the Microsoft Word keyboard shortcuts mentioned in this column, plus a whole lot more:
http://www.fgcu.edu/support/office2000/word/shortcuts.html
p.s. Keyboard shortcuts are the same between Macs and PC’s – you simply substitute the Command button for the CTRL button. The only notable difference is CTRL+Q, which “quits all paragraph formatting†in Word for the PC, and Command+Q, which ejects a diskette for the Mac.
- Author Details
- Books on Sale
- New Releases
- Contact Us
- Be in the Spotlight
Books on sale or free

Related
Keeping Your Hands on the Keyboard
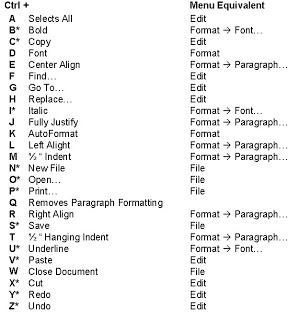
Are you ever typing so quickly that you are afraid to let your hands leave the keyboard? Do you have times when new ideas are coming and you don’t want to stop to pick up your mouse to format?
You have choices. We talked about creating templates in last month’s column. This month I want to share with you the keyboard shortcuts that are available to you in Microsoft Word…some of them even work all over Microsoft Office.
Hit the CTRL key at the same time that you hit the letters on the keyboard to do these shortcuts (ex: Ctrl + A).
* The letters with this symbol next to it work throughout Microsoft Office.
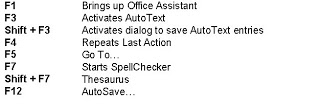
Other Word Shortcuts.
- Author Details
- Books on Sale
- New Releases
- Contact Us
- Be in the Spotlight
Books on sale or free

Related
.
Writer’s Word: The 25 Lines Per Page Secret!
.
by Jen Crooks
.
In my first column for OCC’s e-zine, I found out a few important things.
The first thing was that it is REALLY fun. I had a blast seeing the stories our OCC authors posted every day. Book voodoo, articles on writing…you name it, our members are writing about it.
The second thing I found out was that, while I might be a goddess with business applications, I don’t know diddly about posting blogs.
My screen shots of all the wonderful things I told you about Word’s save functions did NOT show up. I’m going to have to get training from one of our OCC web goddesses (think online class moderators) so I can add in some visual aids.
So take heart, all of you who feel technology challenged – even the gurus muddle around until someone trains them. My “note to self†for this month’s article: Leave the screen shots off until there is time to have a conference call with Marianne.
Last month, Dana asked me if I could “please, please, please write a blog about how to get 25 lines per page†and I responded “of course I will.†Now mind you, I have never done this setting in my life, mainly because I’m half blind and the traditional manuscript requirements ask for ugly fonts (Times New Roman and Courier New) in addition to the 25 lines per page. Times New Roman makes me particularly crazy because when there is an “r†and an “n†next to each other, to me they look like an “m.†I secretly believe that if my manuscript is in an easy-to-read font like Arial or Tahoma, the editor (that poor soul who reads thousands of pages a week) will be more kindly disposed to buy my book. It hasn’t worked for me yet, but I’ll take all the help I can get.
To get back to Dana’s question, I figured there must just be a quick Paragraph setting (this is located in the Format menu) and it would be a snap – four or five steps at the most. The Paragraph dialog box is one of my favorite places in Word. . .there is so much to do here! All you have to do is select the text you’d like to change (hit Ctrl + A on your keyboard to select the entire document) and go to Format. Then Paragraph.
For example, this is where most people go to set Line Spacing to single, double or 1 ½ space. Of course, you can do those with key strokes too:
Ctrl + 1 = Single space
Ctrl + 2 = Double space
Ctrl + 5 = 1 ½ space
While in Paragraph, you can choose the Indent setting of “First line†and indent the first line of each paragraph in your manuscript (the most common setting is .5 inch).
That pesky “Widow/Orphan control†feature is located here. This is what makes all the lines in a paragraph stay together, even when you want them to separate to help you get 25 lines on a page. I have people tell me all the time that they can’t find this sucker – it is located on the second tab in the dialog box, titled “Line and Page Breaks.†The default setting in Word is that the “Widow/Orphan control†is set to ON. (Obviously no one polled us writers when they were deciding which features made the cut in Word.)
Are you catching on yet that the Paragraph dialogue box is a veritable party for us writers?
The last thing you need to know about before I give you “the 25 line secret†in a step-by-step list is that margins and font size – even font type – matter when you are trying to get your manuscript formatted to have 25 lines on a page. That being said, all of my examples use Word’s default margins of Top/Bottom – 1†and Left/Right = 1.25 inch because I like the extra white space. I know, I know…the rules that date back to 1980 say 1†margins only – once you learn how to use your Paragraph settings you can be the Word Dominatrix and MAKE your margins work for you.
Note: For anyone who has never changed their margin settings, there are two easy ways to do it: click on the File menu and choose Page Setup OR double click on the vertical ruler to the left of the document when you are in Print Layout View. You will not see the ruler to the left unless you are in Print Layout View.
I was looking around on the internet to see “how everyone else was doing it†and I saw at least four different methods for how to get 25 lines on a page, zero of which worked for me. I saw one blog where a guy actually went through a formula to calculate the 25 lines. There will be no formulas in my writer-friendly Word column but if you would like to see this craziness, I’ve included the link. (If you follow the link below, just scroll down a bit to see what Allen, the math wizard, advises. Bleck!)
The easiest way to achieve the hallowed 25 lines per page is to follow the steps below:
I used the following font combinations:
Courier New – 14 pt
Arial – 12 pt
(The dreaded) Times New Roman – 12 pt
Right about now, I’m hoping that you see that your font doesn’t really matter – this is ALL about the Paragraph setting.
1. Select all the text in your document that you want to change (for example, you’ll probably omit your title page)
2. Go to Format menu. Then Paragraph.
3. If you haven’t turned off the Widow / Orphan control, do it now
4. On the Indent and Line Spacing tab, go toward the bottom of the dialog box where it says “Line Spacing:†– click the drop down arrow and choose the word “Exactlyâ€
5. In the “At:†field to the right of where it now says “Exactly,†type in “25 ptâ€
6. Click OK
You have now achieved manuscript formatting perfection!
By day, Jen Crooks manages the sales and marketing for a national training firm. After 12 years as a corporate software trainer, it’s nice for her to be able to sit down while she works. By night, Jen writes women’s fiction, chick lit and short stories as Jenny Hansen. She has been a member of OCC since 2001 and has served on OCC’s Board of Directors in a variety of capacities. She is currently the Contest Coordinator for the 2007 Orange Rose Contest for Unpublished Writers.
- Author Details
- Books on Sale
- New Releases
- Contact Us
- Be in the Spotlight
Books on sale or free

Related
by Jenny Hansen
If you’re a writer some way, some day, you’re going to need help with Word. So when I found out OCC has our very own software trainer in our midst, I begged, pleaded and probably promised things I shouldn’t have to get her to share her Word Wisdom with us. Please give a round of applause to our Word Guru, Jennifer Crooks. She’s been training Word-challenged users like me for over twelve years. Thank you, Jen!
At last, a computer column for us creative types! All you Word-challenged non-techies can breathe a heavy sigh of relief. You now have a place that won’t give you phrases that contain thingies like yottabytes (yes, that’s a real word) and will give you practical tips like how to format a manuscript.
Rule #1
Your computer is stupid.
It’s very important to always remember that your computer is a dumb machine. Contrary to popular opinion, it does not have a brain or a little green gremlin inside and it cannot do anything that you don’t tell it to do. It follows your commands completely and exactly, which means that it’s vital that you learn the proper commands to give.
I highly recommend some of the software manuals that are on the market, especially the Dummies series. The first chapter in the PC’s for Dummies book that I bought twelve years ago was titled, “Your Computer Will Not Explode.†(And it really won’t!)
You’re reading this blog so you already know most of the basics about your computer. Additionally, Mac users who struggled for years in a PC world received a huge boost with the release of OS X a few years back. Microsoft Word is pretty much the same now whether you’re on Windows or a Mac.
The first thing you need to know, no matter which version of Word you’re using is: How to save your book and find it again later with all your changes intact.
Usually, a document is saved to diskette to transport the file between computers or to provide a backup copy of the original file that resides on your computer’s hard drive. This blog document is currently saved on my computer’s hard disk, commonly referred to as the “C:†drive or “Hard drive.â€
First, let’s define the difference between the terms “Save†and “Save As†since they mean two entirely different things. Both can be found in the File menu of your word processing program (see example below).
↠File Menu
You must always “Save As†first. In fact, if you hit the “Save†command first it will automatically take you to the “Save As†dialog box.
When you choose “Save As,†you are giving the file a name and a location to reside on your computer, the same as you might make a folder and put it into a filing cabinet. (Any of you have seen my office can just STOP LAUGHING now…my computer files are pristine.)
The “Save†command saves your latest changes OVER the original—this is what you will do as you make changes to your manuscript.
In the “Save As†dialog box below, the most important places to look are:
“Save in†drop down list (top of the box) which lets you choose what folder you want to file the document in, somewhat like you would open the second drawer of your filing cabinet and grab the folder titled, “Current Manuscript.†.
“File name†(line at the bottom) where you name the file something descriptive that you will recognize later. Document1 is a really bad choice.
“Save as type†drop down list (just below “File nameâ€) let’s you choose whether this document will be saved in Microsoft Word format or in something else, such as Rich Text Format (will give the file an RTF extension instead of DOC), that can be opened in a different word processing program.
Last but not least, the next paragraph is the most important one in this entire column.
When you want to save a copy of the file you are working on, first save your latest changes by choosing the “Save†command from either the File menu or the toolbar (third icon from the left), then choose “Save As†to save the file to a new location. This ensures that you have the latest copy in both places.
All of you who have forgotten this in the past are likely sitting back with a smug smile saying, “Uh-huh. Yep, she’s right. I lost 3 hours of writing that one time…†Because trust me, you only make this mistake once or twice before you either head to a computer class or head to the nearest bar for a round of dirty martinis.
One last word of advice until next time…If you save to a place like a flash drive or a diskette that you plan to travel with, make sure that you have closed the file before you pull out the flash drive/diskette. This is the number one reason why people can’t open the files that they have saved onto an external source.
Tune in for my next column where I’ll be answering Dana’s question:
Are you going to show us how to format a manuscript…especially that 25 lines per page setting?
Of course I will.
If you have any questions for our Word Guru send them to: jennyhansensmail@aol.com
By day, Jen Crooks manages the sales and marketing for a national training firm. After 12 years as a corporate software trainer, it’s nice for her to be able to sit down while she works. By night, Jen writes women’s fiction, chick lit and short stories as Jenny Hansen. She has been a member of OCC since 2001 and has served on OCC’s Board of Directors in a variety of capacities. She is currently the Contest Coordinator for the 2007 Orange Rose Contest for Unpublished Writers.
- Author Details
- Books on Sale
- New Releases
- Contact Us
- Be in the Spotlight
Books on sale or free

Related
Affiliate Links
A Slice of Orange is an affiliate with some of the booksellers listed on this website, including Barnes & Nobel, Books A Million, iBooks, Kobo, and Smashwords. This means A Slice of Orange may earn a small advertising fee from sales made through the links used on this website. There are reminders of these affiliate links on the pages for individual books.
Search A Slice of Orange
Find a Column
Archives
Featured Books
THE MORE THE TERRIER
Is Lauren Vancouver's old mentor an animal hoarder?
More info →FUR, FEATHERS AND SCALES: Sweet, Funny, and Strange Animal Tales
So cuddle up with your favorite pet-real or imaginary. No matter. You'll find just the right story to share.
More info →SAVAGED DREAMS
How much will she risk for love? How far will he go for fame?
More info →Newsletter
Contributing Authors
Search A Slice of Orange
Find a Column
Archives
Authors in the Bookstore
- A. E. Decker
- A. J. Scudiere
- A.J. Sidransky
- A.M. Roark
- Abby Collette
- Alanna Lucus
- Albert Marrin
- Alice Duncan
- Alina K. Field
- Alison Green Myers
- Andi Lawrencovna
- Andrew C Raiford
- Angela Pryce
- Aviva Vaughn
- Barbara Ankrum
- Bethlehem Writers Group, LLC
- Carol L. Wright
- Celeste Barclay
- Christina Alexandra
- Christopher D. Ochs
- Claire Davon
- Claire Naden
- Courtnee Turner Hoyle
- Courtney Annicchiarico
- D. Lieber
- Daniel V. Meier Jr.
- Debra Dixon
- Debra H. Goldstein
- Debra Holland
- Dee Ann Palmer
- Denise M. Colby
- Diane Benefiel
- Diane Sismour
- Dianna Sinovic
- DT Krippene
- E.B. Dawson
- Emilie Dallaire
- Emily Brightwell
- Emily PW Murphy
- Fae Rowen
- Faith L. Justice
- Frances Amati
- Geralyn Corcillo
- Glynnis Campbell
- Greg Jolley
- H. O. Charles
- Jaclyn Roché
- Jacqueline Diamond
- Janet Lynn and Will Zeilinger
- Jaya Mehta
- Jeannine Atkins
- Jeff Baird
- Jenna Barwin
- Jenne Kern
- Jennifer D. Bokal
- Jennifer Lyon
- Jerome W. McFadden
- Jill Piscitello
- Jina Bacarr
- Jo A. Hiestand
- Jodi Bogert
- Jolina Petersheim
- Jonathan Maberry
- Joy Allyson
- Judy Duarte
- Justin Murphy
- Justine Davis
- Kat Martin
- Kidd Wadsworth
- Kitty Bucholtz
- Kristy Tate
- Larry Deibert
- Larry Hamilton
- Laura Drake
- Laurie Stevens
- Leslie Knowles
- Li-Ying Lundquist
- Linda Carroll-Bradd
- Linda Lappin
- Linda McLaughlin
- Linda O. Johnston
- Lisa Preston
- Lolo Paige
- Loran Holt
- Lynette M. Burrows
- Lyssa Kay Adams
- Madeline Ash
- Margarita Engle
- Marguerite Quantaine
- Marianne H. Donley
- Mary Castillo
- Maureen Klovers
- Megan Haskell
- Melanie Waterbury
- Melisa Rivero
- Melissa Chambers
- Melodie Winawer
- Meriam Wilhelm
- Mikel J. Wilson
- Mindy Neff
- Monica McCabe
- Nancy Brashear
- Neetu Malik
- Nikki Prince
- Once Upon Anthologies
- Paula Gail Benson
- Penny Reid
- Peter J Barbour
- Priscilla Oliveras
- R. H. Kohno
- Rachel Hailey
- Ralph Hieb
- Ramcy Diek
- Ransom Stephens
- Rebecca Forster
- Renae Wrich
- Roxy Matthews
- Ryder Hunte Clancy
- Sally Paradysz
- Sheila Colón-Bagley
- Simone de Muñoz
- Sophie Barnes
- Susan Kaye Quinn
- Susan Lynn Meyer
- Susan Squires
- T. D. Fox
- Tara C. Allred
- Tara Lain
- Tari Lynn Jewett
- Terri Osburn
- Tracy Reed
- Vera Jane Cook
- Vicki Crum
- Writing Something Romantic
Affiliate Links
A Slice of Orange is an affiliate with some of the booksellers listed on this website, including Barnes & Nobel, Books A Million, iBooks, Kobo, and Smashwords. This means A Slice of Orange may earn a small advertising fee from sales made through the links used on this website. There are reminders of these affiliate links on the pages for individual books.


